Windows Photo Gallery (formerly Windows Live Photo Gallery) writes facial recognition tags (people tags) directly to image file meta-data. Google Picasa until version 3.9 was storing face tags to its own internal database and configuration files. This made it tricky to synchronise face tags between different computers and makes it very easy to loose face tags while re-installing software, moving images, etc.
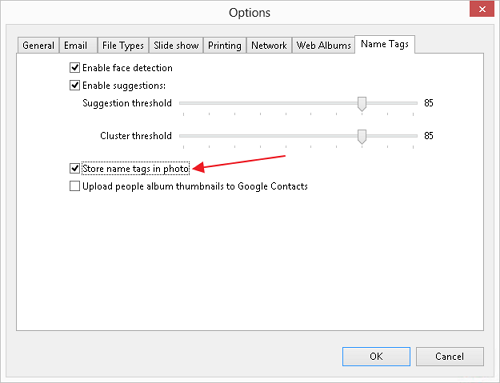
Since version 3.9 Google Picasa has an option to write facial recognition tags to image meta-data. For some reason this option is disabled by default, it can be enabled in Tools > Options > Name Tags > Store name tags in photo.

This setting only affect images tagged from when the setting was enabled. If you want to transfer existing Picasa face tags stored in internal database to image meta-data you can do following:
- Make sure Store name tags in photo option is enabled.
- Just in case backup your photos.
- If you have a small number of photos, simply make an edit to a photo (Fill Light slider works fine). Save the changes (File > Save), and then undo the edit.
- If you have large number of photos, you can move all face tags to a new person and then move them back to the original person. This needs to be done for every person, but if you have large number of photos it’s still more efficient than editing every single photo.
Windows Photo Gallery (WPG) and Picasa use slightly different techniques to save facial recognition tags to image meta-data. While Picasa normally can display WPG tags, WPG will not show Picasa face tags at all.
If you want to migrate WPG people tags to Picasa native format (or other way around) you can use ExifTool. This powerful command line utility allows to view and modify image meta-data in .jpg and many other file formats.
ExifTool author Phil Harvey has written a little ExifTool config file that allows to copy facial tags between Picasa and Windows Photo Gallery formats. Read this forum post for more info.
- First of all make backup copy of all files you intend to modify.
- Then download ExifTool and config file. These are version I successfully used, but you can check for more up to date releases here and here.
- Place exiftool.exe and ExifTool_config_convert_regions in the same folder. Open command prompt (cmd.exe) and navigate to the place where both files are saved (use cd command).
- To copy face tags from WPG to Picasa run following command:
exiftool.exe -config ExifTool_config_convert_regions “-regioninfo<myregion” “foldername”
foldername – name of the folder where images are stored. - To copy face tags from Picasa to WPG run:
exiftool.exe -config ExifTool_config_convert_regions “-regioninfomp<myregionmp” “foldername” - To delete all WPG face tags tun:
exiftool.exe -RegionRectangle= -RegionPersonDisplayName= -RegionPersonEmailDigest= -RegionPersonLiveIdCID= -RegionPersonSourceID= “foldername” - To delete all Picasa face tags run:
exiftool.exe -RegionAppliedToDimensionsH= -RegionAppliedToDimensionsUnit= -RegionAppliedToDimensionsW= -RegionAreaH= -RegionAreaUnit= -RegionAreaW= -RegionAreaX= -RegionAreaY= -RegionName= -RegionType “foldername”

Leave a Reply