Install CentOS (minimal install).

Configure network
Run: ip a to find your network adaptor’s name. In my case the adaptor is called ens32.
Navigate to /etc/sysconfig/network-scripts/ and open network configuration file with your network adaptor name, i.e. ifcfg-ens32
vi ifcfg-ens32
Edit the file replacing all IP addresses according to your network requirements.
HWADDR =00:0B:27:A1:DC:1A
TYPE=Ethernet
BOOTPROTO=static
ONBOOT=yes
IPADDR=192.168.0.10
NETMASK=255.255.255.0
GATEWAY=192.168.0.1
DNS1=8.8.8.8
DMS2=208.67.222.222
Start network:
service network start
Run: ip a again to make sure configuration was applied correctly. You should now have working network connection.
If you need to change anything, modify the same file and run:
service network restart
Install nano editor (optional)
I’m not a big fan of vi. My preferred editor is nano. To install it run:
yum install nano
Change the server hostname
CentOS servers have 3 type of hostnames: static, transient and pretty.
To change all 3 hostnames run:
hostnamectl set-hostname SERVER-NAME
To review the hostnames:
hostnamectl –static
hostnamectl –transient
hostnamectl –pretty
To add the new server hostname to the hosts file, modily: /etc/hosts
Install Apache
yum install httpd
Enable Apache service to start when booting:
systemctl enable httpd.service
Start Apache service:
systemctl start httpd.service
Other useful commands:
Check if Apache running: sudo systemctl is-active httpd.service
Stop Apache: sudo systemctl stop httpd.service
Restart Apache: sudo systemctl restart httpd.service
Default HTML directory: /var/www/html
Configure firewall to allow HTTP access
firewall-cmd –permanent –zone=public –add-service=http
firewall-cmd –reload
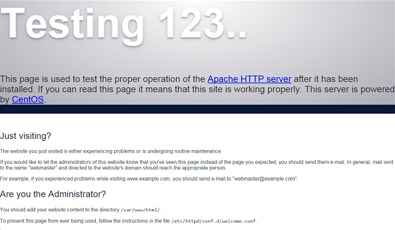
If you now browse to the server’s IP address, you should see Apache welcome message.
If you need to temporary disable firewall, run:
systemctl stop firewalld
To start firewall again:
systemctl start firewalld
To check firewall status:
systemctl status firewalld
Install PHP
yum install php
Restart Apache: systemctl restart httpd.service
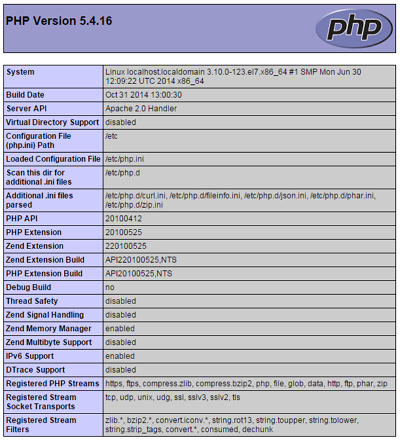
To test PHP:
Create file /var/www/html/info.php with content:
<?php phpinfo(); ?>
Then browse to http://192.168.1.10/info.php
Where 192.168.1.10 – server’s IP address
You should get PHP test page:
Install MySQL (MariaDB)
CantOS 7 is now distributing MariaDB instead than MySQL. MariaDB is a community developed fork of MySQL that is designed to be a drop-in replacement for MySQL.
Install MariaDB
yum install mariadb-server
Start the database engine:
systemctl start mariadb
Secure the database:
mysql_secure_installation
Just follow the wizard and complete following: setup root password, disable anonymous user, disable root remote login, delete test database, reload privilege tables.
Enable MariaDB to start on boot:
systemctl enable mariadb.service
Other useful MariaDB commands:
Check version:
mysql –version
Connect to console:
mysql -u root -p
Configure firewall to allow remote access to MySQL (MariaDB)
This is only required if you need your databases to be accessible over the network
firewall-cmd –permanent –zone=public –add-service=mysql
firewall-cmd –reload
Install phpMyAdmin (optional)
phpMyAdmin is not included in default CentOS repository therefore we’ll nee to add EPEL (Extra Packages for Enterprise Linux) repo.
EPEL can be installed by running:
yum install epel-release
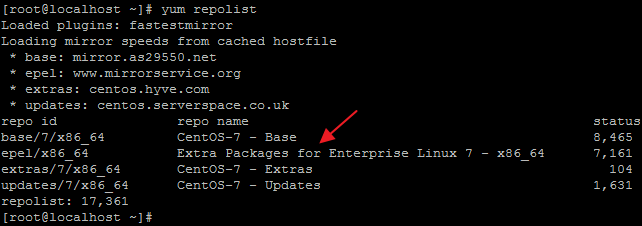
Check repository list and make sure EPEL is now present:
yum repolist
Install phpMyAdmin:
yum install phpmyadmin
Navigate to /etc/httpd/conf.d and edit file phpMyAdmin.conf.
You need to fine lines: Require ip 127.0.0.1 and Allow from 127.0.0.1, and next to them add new lines with the same test replacing 127.0.0.1 with the IP you will be connecting from.
Restart Apache:
systemctl restart httpd.service
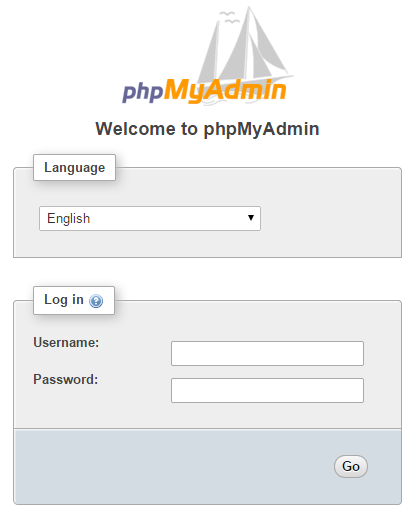
To make sure that phpMyAdmin is working, connect to the server’s ip address, adding /phpMyAdmin at the end on the URL (i.e. http://192.168.1.10/phpMyAdmin) and you should be greeted with phpMyAdmin login page
Install Sendmail (optional)
If you intend to use Sendmail, install it by running:
yum install sendmail
yum install sendmail-cf
To restart Sendmail service:
service sendmail restart
Sendmail path:
/usr/sbin/sendmail
Email logs are located in:
/var/log/maillog
Leave a Reply