All commands in blue need to be run in elevated command prompt.
- Check that your Wi-Fi hardware and drivers support wi-fi hotspot:
netsh wlan show drivers
Look for line: “Hosted Network Support: Yes“
- Create wireless hotpot:
netsh wlan set hostednetwork mode=allow ssid=my-wifi key=mywifipsw
Where:
my-wifi – wireless network SSID (name)
mywifipsw – wireless network password - Start Wi-Fi Hotspot:
netsh wlan start hostednetwork
Go to Network connections (Network and Sharing Center > Change adapter settings) and make sure you have new virtual network adapter
If you need to stop Wi-Fi hotspot run:
netsh wlan stop hostednetwork - Share Internet connection:
- Go to Network connections (Network and Sharing Center > Change adapter settings)
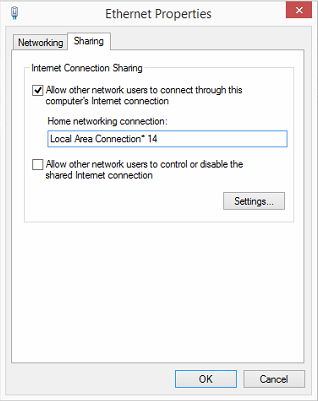
- Right click on the live network connection (one connected to the Internet) > Properties > Sharing
- Check “Allow other network users to connect through this computer’s Internet connection” and from the drop down select connection you created in the previous step.

- Connect your wireless devices (smartphones, tablets, etc) via the hotspot.
To show hotspot statistics, run:
netsh wlan show hostednetwork
After you run through the setup once, in the future you only need to run commands in the step 3 to enable and disable the wi-fi hotspot.
Windows Vista
Windows 7
Windows 8

Leave a Reply