In certain conditions after Windows XP installation your may end up with two Windows XP entries in boot.ini file.
During Start-Up this will appear as a following screen, asking you to select which Operating System you want to run.

This OS selection screen is only useful if you genuinely have two or more Windows installations on the same PC. Otherwise you probably want to get rid of it.
First of all you need to find out which entry is correct. Simply select each entry during start-up and see which one actually loads your Windows installation. If both of them load the same OS, just remove the second one.
Now you have two ways to fix the problem:
1. Advanced – Edit your boot.ini file
Be careful editing boot.ini file. If you make a mistake Windows will refuse to boot. This can be fixed, but make sure you know what you are doing. If you unsure use second option.
- Boot into Windows and open System Properties:
- Right click on My Computer and select Properties
or - Start > Run > sysdm.cpl > OK
- Right click on My Computer and select Properties
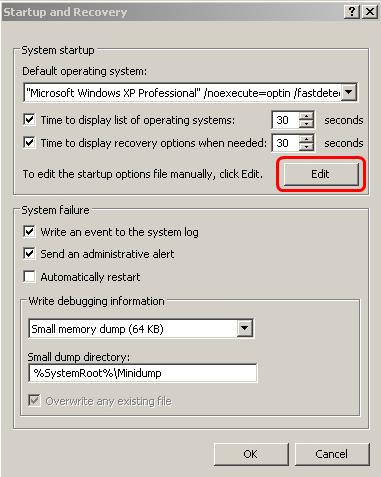
- In Advanced tab, Startup and Recovery section click on Settings
- In System Startup section click on Edit

- This will open boot.ini in notepad
It will look similar to this:
[boot loader]
timeout=30
default=multi(0)disk(0)rdisk(0)partition(2)\WINDOWS
[operating systems]
multi(0)disk(0)rdisk(0)partition(1)\WINDOWS=”Microsoft Windows XP Professional” /noexecute=optin /fastdetect
multi(0)disk(0)rdisk(0)partition(2)\WINDOWS=”Microsoft Windows XP Professional” /noexecute=optin /fastdetect
In [operating systems] section you have entries listed in the above startup screen. Simply delete the whole line with the incorrect entry and save changes.
Restart the computer and OS selection screen should be gone. As I mentioned above if you made a mistake Windows will refuse to boot.
2. Safe – Change default OS and disable timer
- Boot into Windows and open System Properties:
- Right click on My Computer and select Properties
or - Start > Run > sysdm.cpl > OK
- Right click on My Computer and select Properties
- In Advanced tab, Startup and Recovery section click on Settings
- In Default Operating System drop down select correct entry
- In Time to display list of operating systems box reduce time to only couple of seconds.
- Save changes and restart computer.
OS selection screen will still appear but only for couple of seconds so it won’t get in a way so much. If made a mistake selecting default OS and computer refuses to boot, you can still quickly change OS using cursor keys.
Now, when you are sure that the default OS is selected correctly, you can remove to OS selection screen completely:
- Boot into Windows and open System Properties:
- Right click on My Computer and select Properties
or - Start > Run > sysdm.cpl > OK
- Right click on My Computer and select Properties
- In Advanced tab, Startup and Recovery section click on Settings
- Remove checkbox from Time to display list of operating systems
- Save changes and restart computer.

Leave a Reply